100% Security Verified | No Subscription Required | No Malware


Podcasts keep growing in popularity, with hundreds of millions of users worldwide tuning into their favorite shows daily. Most prefer to stick with one or two platforms to listen to all their podcasts seamlessly. That’s why publishing yours on multiple podcasting directories is essential. After all, you want to be where your audience is.
Where should you start? The answer lies in the following podcast directory list. It covers six fan favorites with the most daily active users, each boosting your chances of attracting millions of listeners and consistently growing your audience.
Keep scrolling to learn some vital publishing tips and see how to polish your podcast episodes with Filmora, the best video and audio editing software.
In this article
Apple Podcasts
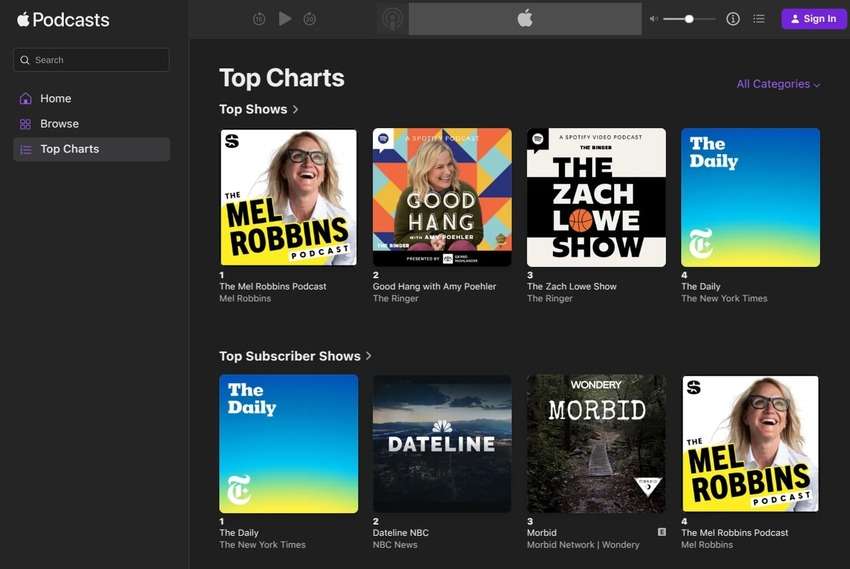
Apple Podcasts is a fantastic choice to publish your work for free. It’s the second-most popular platform for audio-only podcasts, with slightly fewer listeners than Spotify. The app is available on every iPhone, iPad, and Mac by default, but there’s also a web version, making it excellent for reaching millions of users.
The Apple podcast directory offers many marketing tools to promote your show, insightful analytics to improve it, and monetization options through subscriptions. The best part? Submitting your show on Apple Podcasts makes it automatically available on many other platforms, including Overcast, PodCruncher, Downcast, iCatcher, BeyondPod, PodcastRepublic, etc.
Spotify

Spotify is another free podcast directory to consider. Offering the highest number of daily active users, it’s perfect for building an extensive fan base with audio-only and video podcasts.
It offers many customization tools for standing out, monetization opportunities (revenue streams from ads and premium subscriptions), and detailed analytics to keep tabs on your growth. You can also engage with listeners using polls and comments and attract new audiences with short clips, driving them to your full-length episodes.
YouTube Podcasts

YouTube Podcasts is most people’s preferred platform for video podcasts. You can publish them for free directly on the platform or submit your RSS feed (the default option on other podcast directories).
You can also publish audio-only podcasts, but you must post them as videos with a static image (pro tip: add audio visualization for engagement). Like other podcast directories, YouTube Podcasts offers performance analytics (through YouTube Studio) and monetization from premium subscriptions and ads. It also helps creators expand their reach through YouTube Music.
Overcast

Overcast is a free podcast directory for iOS, iPadOS, and watchOS users. They love its intuitive interface, transcripts, and unique features like the Voice Boost for normalizing the volume and Smart Speed for automatically shortening silences.
Therefore, if your target audience prefers Overcast, submit your show to Apple Podcasts. It will automatically appear on Overcast within a day or two (besides many other platforms).
Amazon Music

Amazon Music is another excellent free option for podcasters. It’s perfect for attracting users who prefer listening to podcasts on Alexa-enabled devices. It also has an app for all desktop and mobile devices and a web version for all browsers, making it ideal for reaching a broad audience.
Like other podcasting directories, Amazon Music offers analytics for growing your podcast. You can also monetize your traffic through the Amazon Music Influencer Program and enjoy sharing tools for promotion.
Audible

Audible is the best place for audiobooks and other spoken-word content like podcasts. Like Amazon Music, it’s available on all devices and browsers, helping creators expand their reach.
However, you can’t publish a podcast directly on Audible. You submit the RSS feed on Amazon Music, making your episodes automatically visible on Audible. That’s ideal for attracting audiobook fans who actively use Audible and look for podcasts to spice up their listening routine.
How to Publish a Podcast on Your Chosen Platform

Once you record a podcast episode and upload it to your hosting platform, follow these steps to submit it to your chosen podcast directory:
Step 1: Visit the website and create, verify, and log into your account.
Step 2: Click the dedicated button to add a podcast, such as Get Started or Submit Your Podcast (depending on the platform).
Step 3: Copy your podcast’s RSS feed URL from your hosting platform and paste it into a dedicated box on your podcast directory’s dashboard.
Step 4: Enter the code from a verification email on your dashboard to confirm podcast ownership.
Step 5: Provide the requested information, including your location, podcast title, category, hosting provider, etc.
Step 6: Accept the Terms and Conditions and click Submit.
The publishing process varies across platforms, but all require these essential steps. After completing them, you’ll see your submission request’s status. Most directories verify podcasts within 24 hours. They also quickly update them thanks to your RSS feed, which lets them seamlessly fetch new episodes and their metadata, enclosure tags, artwork, and other items.
Regardless of your chosen podcast directory, you’ll enjoy various tools for optimizing, promoting, and growing your podcast. However, video and audio editing software can help you make it stand out even further. Here’s an excellent option to consider.
Bonus Tip: Make Your Podcast Stand Out
A podcast must look and sound professional to cut through the noise, engage listeners, and compel them to tune in regularly. Wondershare Filmora, the most intuitive video editor with audio and image editing features, can help you polish every episode.
It’s available on macOS and Windows and offers dozens of advanced tools and innovative AI capabilities. It’s beginner-friendly, has drag-and-drop functionality for effortless use, and offers many free features and creative assets like sound effects.
Filmora is perfect for polishing video podcasts with titles, animations, transitions, stickers, filters, video effects, and other features. It can also help you fine-tune an audio podcast, so download it to your PC or Mac and follow along as we walk you through its best audio editing tools.
 secure download

Editing Your Content
You can edit your podcast with Filmora in many ways, but let’s start with the essentials for cutting out unwanted sections and tweaking the sound.
Here’s how to shorten a longer audio, remove background noise, and change your voice using filters:
Step 1: Click New Project on the startup screen.

Step 2: Click Import and choose your podcast audio file.

Step 3: Drag and drop the file onto the audio track on the timeline.

Step 4: Place the playhead at the beginning of an unwanted section and hit the Scissors button to split the audio. Zoom in on the timeline beforehand for precision.

Step 5: Repeat the step to cut the audio at the end of the unwanted section.

Step 6: Select the audio clip you wish to remove and hit Delete on your keyboard.

Step 7: Join the clips using click-and-drag functionality, and repeat the steps for all the parts you wish to delete.

Step 8: Go to Audio > Basic > Denoise in the Properties panel to reduce background noise. You can flip the Normal Denoise, Wind Removal, DeReverb, Hum Removal, and Hiss Removal switches and move sliders for customization.

Step 9: Go to Audio > Voice Changer > Voice Filters in the Properties panel and apply the desired filter (e.g., Vinyl, Surround, or Old Radio) to the selected clip.

Creating Intro and Background Music
Intro or background music can make your podcast more appealing. Filmora’s AI can quickly create unique tracks for your podcast using your chosen theme, genre, tempo, and mood.
Here’s how to create intro or background music with Filmora:
Step 1: Go to Audio > AI Music and select the Theme, Mood, and Genre.

Step 2: Click Settings to choose the tempo, duration, and track number, and hit Generate.

Step 3: Click the Download button on the generated tracks and play them to see what you like best.

Step 4: Position the playhead at the beginning and hit the Plus button on the preferred music track to add it to the timeline.

Step 5: Leave the track as is if it’s background music (you can turn the audio down in the Properties panel). Otherwise, move the podcast audio so it starts after the intro music.

Using Sound Effects
Adding sound effects to different parts of your podcast is perfect for highlighting points or keeping listeners’ attention. Filmora offers a vast library, but you can create your own SFX using AI.
Here’s how to add AI-generated sound effects to your podcast:
Step 1: Go to Audio > AI Sound Effect.
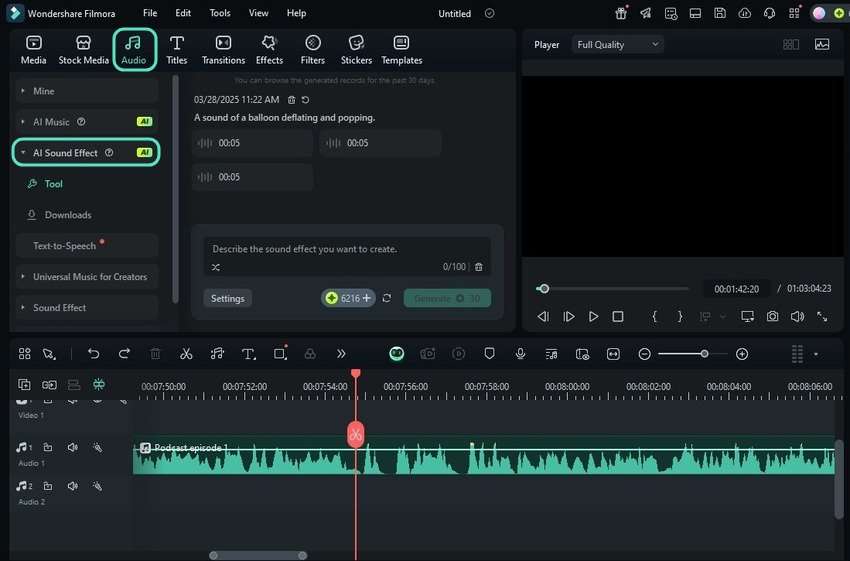
Step 2: Click Settings and adjust the duration and SFX number.

Step 3: Describe the sound you have in mind and click Generate.

Step 4: Hit the Download button on the generated sound effects and play them.

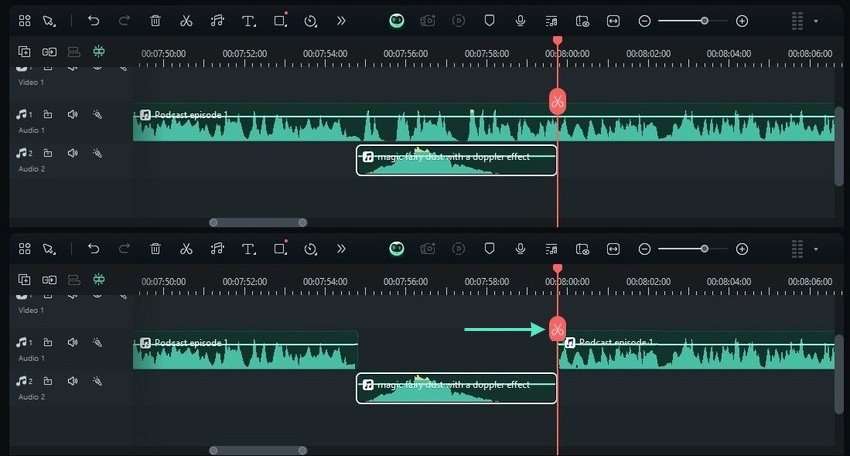
Step 5: Place the playhead where the sound effect will go. Click the Plus button on the chosen SFX to add it to your project.

Step 6: Split the podcast audio using the playhead’s Scissors at the sound effect’s start and end. Then, separate the clips using click-and-drag. You can also leave everything as is so the SFX plays in the background.
Step 7: Click Export to save your edited podcast episode.

Step 8: Set the title, location, and format, and hit Export.

Conclusion
You can submit your show to many podcasting directories, but the six above are an excellent starting point. They have more users than all lesser-known directories, making them perfect for building a loyal following and generating a steady revenue stream.
Still, growing a podcast audience on the listed platforms takes time. They have marketing solutions and insightful analytics to boost your growth, but refining your podcast with editing tools can increase your chances of success.
Filmora can help you make the podcast stand out and feel more professional, so download it to your computer and explore all its intuitive features.