- • How-to tips for advanced video editing
- 1. Add elements
- 1.1 How to add text overlay
- 1.2 How to add transitions between videos
- 1.3 How to blur face in a video
- 1.4 How to add mosaic on video
- 2. Split screen
- See more
- 3. Frame and stabilization
- See more
- Learn how to enhance your video storytelling with dynamic transitions.
- Explore Filmora's extensive library of transition effects for every style.
- Transform your videos with seamless transitions that keep viewers engaged!

 100% Security Verified | No Subscription Required | No Malware
How to Add Video and Audio Transition Between Scenes/Clips

Jun 05, 2025• Proven solutions
In the world of content creation, it is important to make good videos to stand out. Storytelling in a video plays a huge role in captivating the audience. Adding transitions in your films is a great way to create a story without having to say a word. Wondershare Filmora is a professional video editor that offers diverse transitions. Thus, this article explores how you can use Filmora transitions to complement your movies across the desktop and mobile device.

Part 1. How to Add Video and Audio Transitions Through Wondershare Filmora?
Wondershare Filmora is a practical video editing software that allows you to create smooth audio and video transitions. The following section covers all the details necessary for creating video and audio transitions to a video using Filmora:
Using the Desktop Version for Video Transitions
The desktop version of Wondershare Filmora allows you to apply the transitions by splitting your video track. Users can import multiple videos and add transitions between them for a smoother flow. If you like an asset, save it in the designated Mine folder for easier navigation in the future. Once applied, the transitions Filmora can be customized by adjusting their duration. Follow the guide below to learn how these assets can be used:
- Step 1. Press New Project and Import a Video. To begin with, open Filmora on the PC and use its main interface to start a "New Project." On being directed to the next window, click "Import" to drag a video onto the timeline.

- Step 2. Split the Video Track to Prepare for a Transition. Next, move the play head where you need to add the transition and right-click on the timeline to "Split" the track.

- Step 3. Add the Transition and Customize its Duration. To add an asset to the video, enter the "Transitions" tab from the top toolbar and apply your favorite option. Using the right panel, set the duration of the transition as needed.

- Step 4. Make More Transition Adjustments. From the "More Settings" section on the right, select the desired option based on how you want the transition to appear in the video.


Using the Desktop Version to Apply Audio Transitions
Besides video, the versatile Filmora for desktop provides audio transitions as well. This facility is great for artistic minds as it subtly shifts you from frame to frame. In addition to providing a scene-to-scene shift, it also gives a professional polish to your audio. Check out the following guide to learn how to add transitions in Filmora:
- Step 1. Add a Keyframe and Make Audio Transitions. To add audio transitions, access the basic "Audio" panel on the right and click the "Keyframe" icon in the "Sound Balance" section. Create a transition by adjusting the Fade In, Fade Out, and Pitch of the audio.

- Step 2. Create a Transition Through Speed Ramping. Alternatively, you can enter the "Speed" section to access the "Speed Ramping" panel on the right. From the given options, apply the curve that will create an audio transition.

- Step 3. Use a Sound Effect as a Transition. To create a transition through a sound effect, open the "Audio" tab from the top toolbar and access the "Sound Effect" section from the left. Now, split the video track and apply the sound at the end of the split clip.

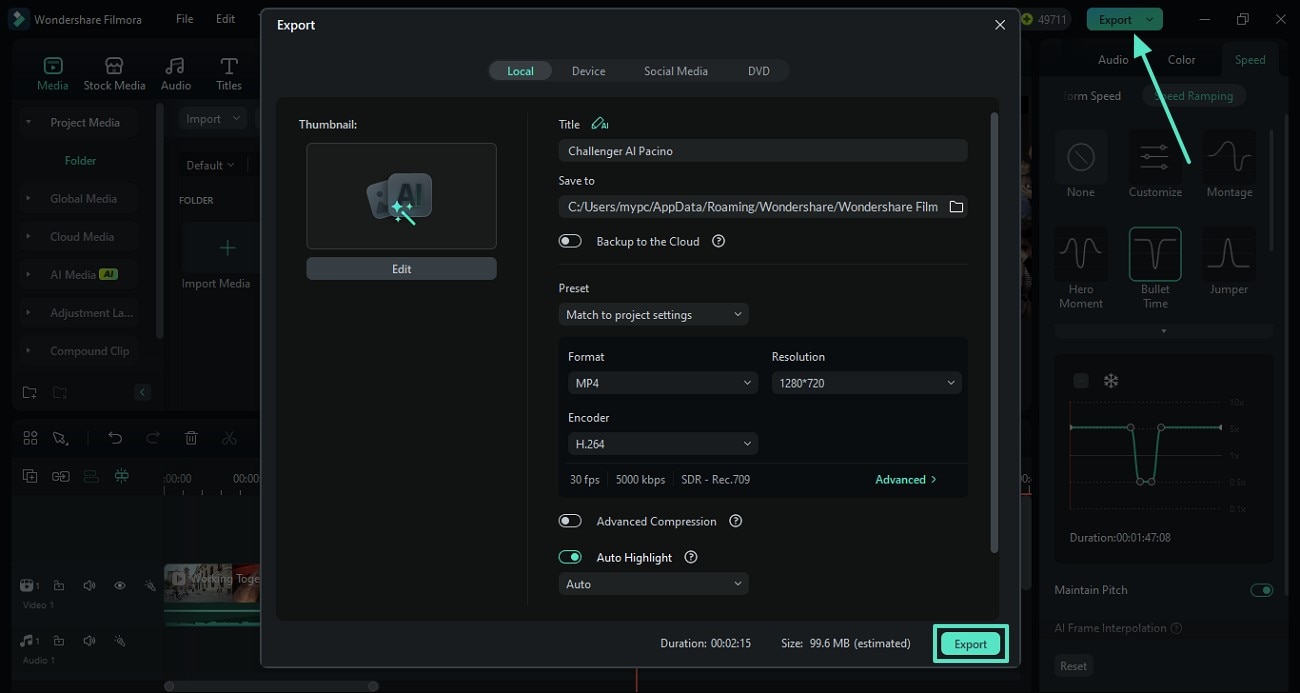
- Step 4. Save the Video File to Your Device. After your video has smooth audio and video transitions, click "Export" from the top right to save the video in your desired settings.
Using the Filmora App to Create Video Transitions
The Filmora App [iOS/Android] is an easy-to-use video editing app that lets you smoothly transition through video and audio. The numerous transition assets can be customized by setting your desired duration. The transitions Filmora are organized into categories to help you find the intended assets with ease. The following guide should be followed to learn how you can use these transitions for your videos:
- Step 1. Start a New Project to Import Your Videos. First, open the Filmora App and tap the "New Project" button to import multiple videos from your phone.

- Step 2. Add a Transition and Adjust Its Duration. Now, select the "Transition" icon from the timeline to unfold the transitions library. After applying one of the assets, set its duration by dragging the designated slider.

Using the Filmora App to Create Audio Transitions
In addition to video, the Filmora transitions can also be used for audio to enhance your storytelling. You can create an audio blend by adjusting the volume settings. The fade in and out settings also come in handy to adjust the volume while moving to the next scene. For more information, follow the steps below and learn how to use the Filmora App to make audio transitions:
- Step 1. Adjust the Volume for Subtle Transitions. First, select the video track and enter the "Volume" tab from the next interface. Using the Volume section, adjust the "Fade In" and "Fade Out" values depending on your needs.

- Step 2. Save the Video in Your Desired Settings. After you are done editing the video, tap "Export" from the top right corner and save the video in the frame rate and resolution of your choice.

 secure download
🤩 Posts You Might Be Interested In:
- Top 7 Transition Sound Effects: Enhance Your Edits
- How To Transform Your Presentations Using Morph Transition Google Slides
- Understand the Wipe Transition in Film and Learn How to Use it Properly
- PowerPoint Morph 101: How to Create a Morph PowerPoint Presentation
- 10 Types of Video Transitions and How to Use them Effectively
Conclusion
To conclude the discussion, using the Filmora transitions in your videos is a great way to smoothly shift from one video clip to the next. This article explored the video transitions to subtly blend two different frames into one.
Afterward, we looked into the audio transitions to complement the video transitions for a professional polish. In this discussion, we covered the desktop and mobile versions of Wondershare Filmora for comprehensive video editing through transitions.
This step-by-step iMovie guide is about how to use the iMovie green/blue screen to change the background of your video.
by James Hogan May 12, 2025 10:50 AM
If you are looking a way to add a professional touch to your next video, then consider adding text to video. Now follow the steps below to see how to add text to a video.
by James Hogan May 12, 2025 10:50 AM
James Hogan
contributor Editor