Think Bigger From Filmora User Guide
-
Preparations
-
Account
-
Get Started & Basic Settings
-
Compatibility & Tech Specs
-
Performance Settings
-
-
Creating Projects
-
Creating New Projects
-
-
Importing & Recording
-
Video Editing for Windows
-
Basic Video Editing
- Enable/Disable Clip in Windows
- Magnetic Timeline for Windows
- Drawing Tools fo Windows
- Select All Clips on Timeline for Windows
- Manage Timeline and Tracks
- Auto Ripple for Windows
- Split & trim video
- Crop & Pan & Zoom Video
- Compositing
- Change video playback speed
- Playing videos in reverse
- Mark In and Mark Out for Windows
- Markers for Windows
- Group editing
- Customizable Backgrounds for Videos and Images in Windows
- Video snapshot
- Using freeze frame
- Logo Reveal For Windows
- Apply auto enhance
- Applying drop shadow
- Adjustment layer for Windows
- Transforming
- Video Editing Ruler – Windows
-
Advanced Video Editing
-
AI-Powered Video Editing
- Smart Scene Cut for Windows
- Smart Short Clips for Windows
- AI Face Mosaic for Windows
- AI Video Enhancer
- AI Text-to-Video for Windows
- Planar Tracking
- AI Idea to Video for Windows
- Image to Video for Windows
- Instant Cutter Tool for Windows
- AI Text-Based Editing for Windows
- AI Mate Editing for Windows
- Create with instant mode
- ChatGPT Plugin - AI Copywriting
- AI smart cutout
- Lens correction
- Auto reframe video
- AI Portrait Cutout
- Scene detection feature
- AI Smart Masking for Windows
- Make motion tracking
- Stabilization
- AI Video/Photo Object Remover for Windows
- AI Smart Search for Windows
- AI Skin Tone Protection for Windows
- AI Image for Windows
- Chroma key (green screen)
- Super Slow Motion with Optical Flow for Windows
- Video Denoise for Windows
-
-
Audio Editing for Windows
-
Basic Audio Editing
-
Advanced Audio Editing
-
AI-Powered Audio Editing
-
-
Text Editing for Windows
-
Basic Text Editing
-
Advanced Text Editing
-
AI-Powered Text Editing
-
-
Video Customizations
-
Video Effects
-
Audio Effects
-
Transitions
-
Stickers
-
Filters
-
Color Editing
-
Animations
-
Templates
-
Asset Center
-
-
Exporting & Share & Cloud Backup
AI Smart Cutout
This guide helps you remove the background of an image or a video. The AI Smart Cutout is good at cutting an image out and performs well in identifying needed sections in a continuous clip.
Apply AI Smart Cutout to Images on Windows
Here are the steps for processing images with smart cutout on Windows.
Step 1: Add the image to the processing interface
Launch Filmora on your computer. Then, drag your required image to the bottom of the interface or select it from the files.
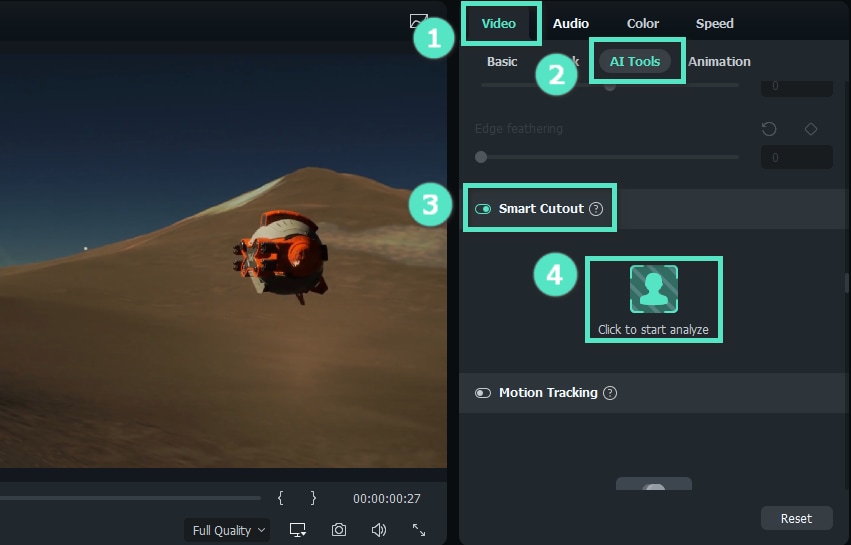
Step 2: Launch the Smart Cutout event
1Click the image on the timeline to launch the settings window.
2Click Image>AI Tools to start a new task.
3Then, click the button beside Smart Cutout to start the function.
4After it, you need to click the Click to start to analyze to process cutout.
Step 3: Draw the section you need
- Use the Brush to draw the area to cut out. A simple line around the edge of the subject is enough for the tool to recognize where you need it.
- If some unwanted areas are selected, you can click the icon, which is an Eraser with a minus to erase them.
- If you have amplified the image and want to move the image for more detailed adjustments, use the Palm.

Step 4: Change the settings
- Simple Mode Setting
On the right side of the interface, there are settings of Brush Size, Edge Thickness, and Edge Feather.
The Brush Size is used to draw more precisely, with the size ranging from 1 to 300; Edge Thickness is to modify the margin encircling the subject, ranging from -100 to 100; If you want to adjust harsh edges to blend images, you can change the figure of Edge Feather.

- Invert Mask
If you want to retain the background not chosen, you can click the Invert Foreground/Backg icon, as marked in the image below.
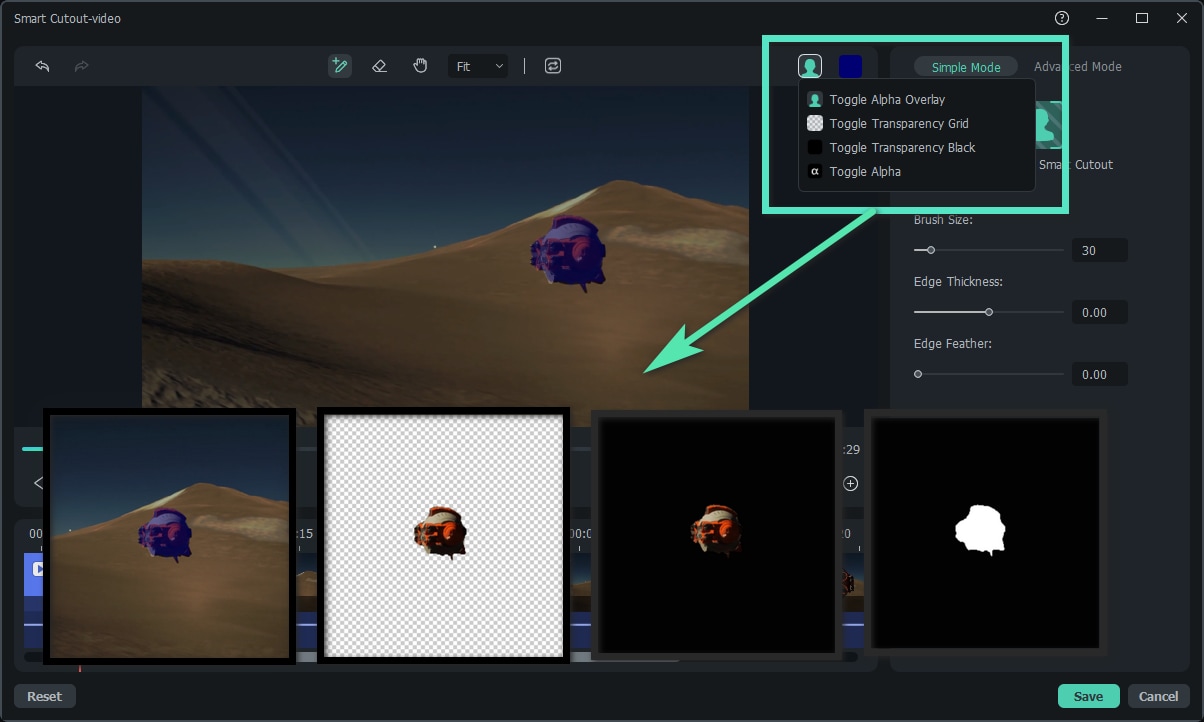
- Preview Mode - Background
After confirming the selected area, you can set the background of the image. Click the bust icon in the upper right corner of the window and choose from Toggle Alpha Overby, Toggle Transparency Grid, Toggle Transparency Black, or Toggle Alpha. Then, change the edge thickness or the edge feather on the left side of the window if you need.

Step 5: Save the changes
When you are done with the settings, click Save. Then, the effect will be applied to your image automatically.
Apply AI Smart Cutout to Videos on Windows
You can follow the procedures below to remove the background in a video on Windows.
Step 1: Launch the application and add a video to the prompted interface.
Step 2: Click the video in the processing section, and the video settings window will appear. You can click AI Tools in the Video tab, and after clicking the button to launch Smart Cutout, click the bust icon.
Step 3: Use the brush icons to select your demanded area in the video. The brush with a plus is used to draw where to cut out, and the eraser with a minus is used to erase. Flexibly apply features such as Edge Thickness and Edge Feather to increase the quality.
Step 4: Find Click to start the Smart Cutout icon in the Simple Mode section and click it. Then, Filmora will extract the selected subject from the whole video and export the output in a short while.

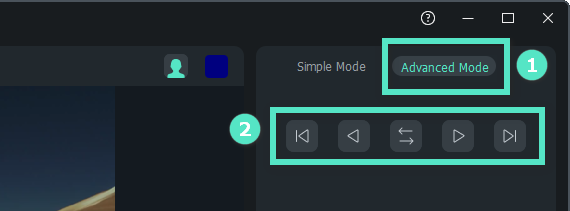
Step 5: Change the background of the video by clicking the bust icon in the upper right corner. Also, you can change more advanced settings in the Advanced Mode tab to decide which part of the video to process. You can set the mode from Track One Section Reverse, Track Reverse, Track Forward and Reverse, Track Forward, and Track One Section Forward.
Step 6: Click Save when you finish editing. The interface will go back to the home editing page and apply your adjustment.
Related Posts
Featured Articles
How to Change the Background Color in Images in Just a Few Clicks?
Want to change the photo background color? Master the process with Filmora and discover other fantastic AI features for enhancing images.
5 Ways | How to Record A Zoom Meeting?
Are you looking for the best way to record meetings on Zoom? Here is a comprehensive guide on the best tips and tools to record in Zoom.
Top 20 Real Estate Christmas Marketing Ideas to Try Out This Year
Here are some ideas for approaching your real estate Christmas marketing this year.
Recommended User Guide
AI Smart Search for Windows
Use powerful AI technology to easily search objects, people, texts, dialogues, and other visual elements from your videos.
Smart Scene Cut for Windows
This guide explains how to use Smart Scene Cut in your videos on Windows.
Smart Short Clips for Windows
This guide will help you convert your long videos into eye-catching highlights in a few clicks.